
How to build a Rock Paper Scissors game in Ethereum using Chainlink VRF, Foundry and Next.js
This article will guide you through the process of creating a full stack Web3 Rock Paper Scissors game in Ethereum using Chainlink VRF, Foundry and Next.js. It will covers testing, deployment, and frontend integration with Next.js.
I built this as a learning project in the Crypto Academy of Vacuumlabs. Hopefully it will help you learn as well!
Full code can be found here.
Table of Contents
- Setting Up the Project
- Building the Smart Contract
- Deploying the Smart Contract Locally
- Testing the Smart Contract
- Deploying the Smart Contract to Sepolia
- Integrating the Smart Contract with Next.js
- Running the Dapp Locally
Setting Up the Project
Let's start by setting up the project structure. We will be keeping all of the code in a single monorepo for simplicity and ease of development.
Our project structure will look something like this:
RPS3/
  contracts/
        - Contains the smart contract code, tests, and deployment scripts.
  frontend/
        - Contains the Next.js frontend code.
First, let's initialize the contracts directory. We'll be using foundry for our smart contract development because of it's excellent performance and great testing support. If you don't have foundry installed, you can install it by using the foundry toolcahin installer:
curl -L https://foundry.paradigm.xyz | bash
Then you can run foundry to install forge, cast, anvil, and chisel:
foundry
Once this is complete, we can now inintialize the contracts directory using the forge init command which will setup a basic project structure for smart contract development:
cd RPS3
forge init contracts
Lastly, we will initialize the frontend directory with Next.js. My preferred way for quickly setting up a new Next.js project is using create-t3-app because of it's built-in support for TailwindCSS and TypeScript. You can initialize the frontend directory with the following command and only enabling Tailwind, TypeScript and the new Next.js App Router:
pnpm create t3-app@latest

◇  What will your project be called?
│  frontend
│
◇  Will you be using TypeScript or JavaScript?
│  TypeScript
│
◇  Will you be using Tailwind CSS for styling?
│  Yes
│
◇  Would you like to use tRPC?
│  No
│
◇  What authentication provider would you like to use?
│  None
│
◇  What database ORM would you like to use?
│  None
│
◇  [EXPERIMENTAL] Would you like to use Next.js App Router?
│  Yes
│
◇  Should we initialize a Git repository and stage the changes?
│  No
│
◇  Should we run 'pnpm install' for you?
│  Yes
│
◇  What import alias would you like to use?
│  ~/
And just like that we have our project structure setup!
Building the Smart Contract
You can think of the smart contract as the backend for our rock paper scissors game, but the cool part is we'll be utilizing the Ethereum blockchain which will make it decentralilzed and verifiable. The smart contract will handle the core game logic and call Chainlink VRF (via the direct funding method) to allow us to generate verifiable randomness for the computer choice. Chainlink VRF is a third-party oracle which allows us to generate randomness on-chain in a secure and verifiable way. This is important because we need to ensure that the computer's choice is truly random and cannot be manipulated by any party.
First, we need to install the Chainlink contracts so we can use it for development and testing. We can do this by running the following command:
forge install smartcontractkit/chainlink-brownie-contracts
Once its installed we can add a remapping in foundry.toml to make it easier to import the Chainlink contracts:
[profile.default]
src = "src"
out = "out"
libs = ["lib"]

remappings = ['@chainlink/contracts/=lib/chainlink-brownie-contracts/contracts/', '@solmate=lib/solmate/src/']

# See more config options https://github.com/foundry-rs/foundry/blob/master/crates/config/README.md#all-options
We can now work on writing code to build the main smart contract of our game. We will start by creating a new file called RockPaperScissors.sol in the src directory and add the following code:
// SPDX-License-Identifier: UNLICENSED
pragma solidity ^0.8.13;

import {VRFV2WrapperConsumerBase} from "@chainlink/contracts/src/v0.8/VRFV2WrapperConsumerBase.sol";

/**
 * @title Rock Paper Scissors game contract
 * @author [Your name here]
 * @notice This contract is for a Rock Paper Scissors game
 * @dev Implements Chainlink VRFv2
 */
contract RockPaperScissors is VRFV2WrapperConsumerBase {
    event PlayGameRequest(uint256 indexed requestId, address indexed player);
    event PlayGameResult(
        uint256 indexed requestId,
        address indexed player,
        Outcome outcome
    );
    event Withdraw(address indexed player, uint256 amount);

    struct GameStatus {
        uint256 fees;
        address player;
        Outcome outcome;
        Choice playerChoice;
    }

    enum Choice {
        ROCK,
        PAPER,
        SCISSORS
    }

    enum Outcome {
        NONE,
        WIN,
        LOSE,
        DRAW
    }

    mapping(uint256 => GameStatus) public statuses;
    mapping(address => uint256) public balances;
    mapping(address => uint256) public lastRequestId;
    mapping(address => GameStatus[]) internal gameHistory;

    uint256 internal totalBalanceAmount = 0;
}
This part of the code sets up the basic structure of our smart contract. We import the Chainlink VRF contract and inherit the VRFV2WrapperConsumerBase. We also define the data structures we will need for the game:
- PlayGameRequest: This event will be emitted when a player requests to play the game.
- PlayGameResult: This event will be emitted when the result of the game is determined.
- Withdraw: This event will be emitted when a user withdraws their balance.
- GameStatus: This struct will hold the game status state that will be used throughout the application. This includes the fees, player address, player choice and outcome.
- Choice: This enum will hold the possible choices for the game.
- Outcome: This enum will hold the possible outcomes for the game.
- statuses: This mapping will hold the game status for each request.
- balances: This mapping will hold the balances of each player.
- lastRequestId: This mapping will hold the last request ID (from the Chainlink VRF request) of each player.
- gameHistory: This mapping will hold the game history of each player.
- totalBalanceAmount: This variable tracks the sum of all player's balances which is used to check if the contract still has enough funds to coordinate more games.
With that done, let's declare some variables we will need and create the constructor for the smart contract which will initialize the VRFV2WrapperConsumerBase and inject it with the linkAdress and vrfWrapperAddress. We also make the constructor payable so we can send some initial funds to the contract.
    uint128 constant entryFees = 0.001 ether; // The entry fees we will charge the player for entering a game
    uint32 constant callbackGasLimit = 1_000_000; // The gas limit for the Chainlink VRF callback
    uint16 constant requestConfirmations = 3; // The number of confirmations we will require for the Chainlink VRF request
    uint32 constant numWords = 1; // The number of random words we will request from Chainlink VRF

    constructor(
        address linkAddress,
        address vrfWrapperAddress
    ) payable VRFV2WrapperConsumerBase(linkAddress, vrfWrapperAddress) {}
The VRFV2WrapperConsumerBase contract is the base contract that we inherit from in order to be able to request randomness from Chainlink by sending them LINK tokens. This is why we need the linkAddress and vrfWrapperAddress since these are the addresses of the Chainlink VRF and LINK token contracts on the respective network we will deploy to.
With all that setup, let's build our first function which will allow a player to enter a game by selecting a choice and sending the required entry fee to the contract. In this function, we will also call the requestRandomness function which will trigger a request to Chainlink VRF to generate a random word. A random word is what Chainlink calls its random numbers. We will store the relevant data in our GameState struct as well so we can keep track of the current state of the game. Also note that we assume a potential win to the totalBalanceAmount to prevent the contract from running out of balance.
    function playGame(Choice choice) external payable returns (uint256) {
        require(msg.value == entryFees, "Insufficient entry fees");

        // Assume potential win to totalBalanceAmount to prevent contract from running out of balance
        totalBalanceAmount += entryFees * 2;
        require(
            address(this).balance >= totalBalanceAmount,
            "Insufficient contract balance"
        );

        uint256 requestId = requestRandomness(
            callbackGasLimit,
            requestConfirmations,
            numWords
        );

        lastRequestId[msg.sender] = requestId;

        statuses[requestId] = GameStatus({
            fees: VRF_V2_WRAPPER.calculateRequestPrice(callbackGasLimit),
            player: msg.sender,
            outcome: Outcome.NONE,
            playerChoice: choice
        });

        emit PlayGameRequest(requestId, msg.sender);

        return requestId;
    }
So far when a player calls the playGame function, we only send a request for a random word but we don't get anything in return yet. In order to get the result of our randomness request we need to implement the fulfillRandomWords function which is a callback function that Chainlink will call when the randomness request is fulfilled. This function will be called by the Chainlink VRF contract and will be responsible for updating the game status with the result of the randomness request. This is also where we will be able to determine the outcome of the game and payout the player if he wins or refund his entry fees if it's a draw. Notice that we adjust the totalBalanceAmount accordingly as we assumed a win earlier in the playGame function.
    function fulfillRandomWords(
        uint256 requestId,
        uint256[] memory randomWords
    ) internal override {
        require(statuses[requestId].fees > 0, "Request not found");

        Choice computerChoice = Choice(randomWords[0] % 3);

        if (statuses[requestId].playerChoice == computerChoice) {
            // Push. Refund entry fees.
            statuses[requestId].outcome = Outcome.DRAW;
            balances[statuses[requestId].player] += entryFees;
            totalBalanceAmount -= entryFees; // Subtract entry fee as totalBalanceAmount was added in playGame fn with a potential win
        } else if (
            (statuses[requestId].playerChoice == Choice.ROCK &&
                computerChoice == Choice.SCISSORS) ||
            (statuses[requestId].playerChoice == Choice.PAPER &&
                computerChoice == Choice.ROCK) ||
            (statuses[requestId].playerChoice == Choice.SCISSORS &&
                computerChoice == Choice.PAPER)
        ) {
            // Win. Get double entry fees.
            statuses[requestId].outcome = Outcome.WIN;
            balances[statuses[requestId].player] += entryFees * 2;
        } else {
            // Lose. Keep entry fees.
            statuses[requestId].outcome = Outcome.LOSE;
            totalBalanceAmount -= entryFees * 2; // Subtract entry fee as totalBalanceAmount was added in playGame fn with a potential win
        }

        gameHistory[statuses[requestId].player].push(statuses[requestId]);

        emit PlayGameResult(
            requestId,
            statuses[requestId].player,
            statuses[requestId].outcome
        );
    }
*Take note of the emit calls in the playGame and fulfillRandomWords functions. This will push events to any listeners which will be important for integration with the frontend later.
Notice that we don't automatically send the funds to the player in the fulfillRandomWords function. We only update the game status and the player's balance. This is because we want to keep the smart contract as secure as possible and avoid reentrancy attacks. The player can withdraw their funds at any time by calling the withdraw function which will transfer the funds to the player's address. This will also adjust the totalBalanceAmount and emit a Withdraw event.
    function withdraw() external {
        require(balances[msg.sender] > 0, "Insufficient balance");
        uint256 amount = balances[msg.sender];
        balances[msg.sender] = 0;
        (bool sent, ) = payable(msg.sender).call{value: amount}("");
        require(sent, "Failed to send Ether");

        totalBalanceAmount -= amount;

        emit Withdraw(msg.sender, amount);
    }
Lastly, the public mappings we set earlier will have a getter generated automatically by the compiler. For the gameHistory mapping, we need to add it manually as the automatically generated getter function will require an index for getting a value from the array, but our use case requires the entire array to be returned. Let's manually add a getter function for the gameHistory so we can easily query the past game's of a player.
    function getGameHistory() external view returns (GameStatus[] memory) {
        return gameHistory[msg.sender];
    }
And with that, we have completed the smart contract for our simple Rock Paper Scissors game! We can now move on to testing the smart contract to make sure everything is working as expected.
Deploying the Smart Contract Locally
In order to deploy our smart contract, we have to write scripts that will handle the deployment process. These scrips will be written in Solidity as well. For local deployment, we will be using the anvil command which is part of the foundry toolchain.
Since we are using Chainlink VRF, we need to deploy the mock contracts for the VRFCoordinator, LinkToken, V3Aggregator and VRFV2Wrapper. This is usually already deployed for us on the network by Chainlink but we need to deploy it ourselves for local testing purposes. We also need to fund the VRFV2Wrapper and RockPaperScissors contract with some LINK tokens so we can make requests for randomness. We can create a new file called LocalDeployment.s.sol in the scripts directory and add the following code:
// SPDX-License-Identifier: UNLICENSED
pragma solidity ^0.8.13;

import {RockPaperScissors} from "../src/RockPaperScissors.sol";
import {VRFCoordinatorV2Mock} from "@chainlink/contracts/src/v0.8/mocks/VRFCoordinatorV2Mock.sol";
import {MockV3Aggregator} from "@chainlink/contracts/src/v0.8/tests/MockV3Aggregator.sol";
import {MockLinkToken} from "@chainlink/contracts/src/v0.8/mocks/MockLinkToken.sol";
import {VRFV2Wrapper} from "@chainlink/contracts/src/v0.8/VRFV2Wrapper.sol";
import {Script, console} from "forge-std/Script.sol";

contract LocalDeploymentScript is Script {
    RockPaperScissors public rockPaperScissors;
    VRFCoordinatorV2Mock public vrfCoordinator;
    MockLinkToken public linkToken;
    MockV3Aggregator public linkEthFeed;
    VRFV2Wrapper public vrfWrapper;

    uint256 public constant entryFees = 0.001 ether;
    int256 public constant linkEthPrice = 3000000000000000;
    uint8 public constant decimals = 18;

    function setUp() public {}

    function deployContracts() public {
        // Deploy Mock Contracts
        uint96 baseFee = 100000000000000000;
        uint96 gasPriceLink = 1000000000;
        console.log("Deploying VRFCoordinatorV2Mock...");
        vrfCoordinator = new VRFCoordinatorV2Mock(baseFee, gasPriceLink);
        console.log("VRFCoordinatorV2Mock address: ", address(vrfCoordinator));
        console.log("Deploying MockLinkToken...");
        linkToken = new MockLinkToken();
        console.log("MockLinkToken address: ", address(linkToken));
        console.log("Deploying MockV3Aggregator...");
        linkEthFeed = new MockV3Aggregator(decimals, linkEthPrice);
        console.log("MockV3Aggregator address: ", address(linkEthFeed));

        // Set up and configure VRFV2Wrapper
        console.log("Deploying VRFV2Wrapper...");
        vrfWrapper = new VRFV2Wrapper(
            address(linkToken),
            address(linkEthFeed),
            address(vrfCoordinator)
        );
        console.log("VRFV2Wrapper address: ", address(vrfWrapper));

        // Configuration parameters for VRFV2Wrapper
        uint32 wrapperGasOverhead = 60000;
        uint32 coordinatorGasOverhead = 52000;
        uint8 wrapperPremiumPercentage = 10;
        bytes32 keyHash = 0xd89b2bf150e3b9e13446986e571fb9cab24b13cea0a43ea20a6049a85cc807cc;
        uint8 maxNumWords = 10;

        // Call setConfig function
        vrfWrapper.setConfig(
            wrapperGasOverhead,
            coordinatorGasOverhead,
            wrapperPremiumPercentage,
            keyHash,
            maxNumWords
        );

        // Fund the VRFv2Wrapper subscription
        console.log("Funding VRFv2Wrapper subscription...");
        vrfCoordinator.fundSubscription(
            vrfWrapper.SUBSCRIPTION_ID(),
            10000000000000000000
        );

        // Deploy RockPaperScissors contract
        console.log("Deploying RockPaperScissors...");
        rockPaperScissors = new RockPaperScissors(
            address(linkToken),
            address(vrfWrapper)
        );
        console.log("RockPaperScissors address: ", address(rockPaperScissors));

        // Fund RockPaperScissors contract with LINK tokens
        console.log("Funding RockPaperScissors contract...");
        linkToken.transfer(address(rockPaperScissors), 10000000000000000000);
    }

    function run() public {
        uint privateKey = vm.envUint("LOCAL_DEV_ANVIL_PRIVATE_KEY");

        vm.startBroadcast(privateKey);

        deployContracts();

        // Fund RockPaperScissors contract with ETH
        console.log("Funding RockPaperScissors contract with ETH...");
        payable(rockPaperScissors).transfer(10 ether);

        vm.stopBroadcast();
    }
}
In order to run this script, we need to have a local blockchain running which we can do by running the anvil command in a new terminal window:
anvil
This will output a private key that we should place in our .env file as LOCAL_DEV_ANVIL_PRIVATE_KEY so the script can refer to it. We can then run the script using the forge script command:
forge script script/LocalDeployment.s.sol:LoaclDeploymentScript --rpc-url "http://127.0.0.1:8545" --broadcast -vvvv
To play the game locally using foundry scripts, refer the the GitHub repository foundry README
Testing the Smart Contract
Testing in foundry is great because we can write the tests in Solidity itself. This makes it easy to write and run tests without having to switch between different languages and tools. We can create a new file called RockPaperScissors.t.sol in the test directory and add the following code:
// SPDX-License-Identifier: UNLICENSED
pragma solidity ^0.8.13;

import "forge-std/Test.sol";
import {RockPaperScissors} from "../src/RockPaperScissors.sol";
import {LocalDeploymentScript} from "../script/LocalDeployment.s.sol";
import {VRFCoordinatorV2Mock} from "@chainlink/contracts/src/v0.8/mocks/VRFCoordinatorV2Mock.sol";
import {MockV3Aggregator} from "@chainlink/contracts/src/v0.8/tests/MockV3Aggregator.sol";
import {MockLinkToken} from "@chainlink/contracts/src/v0.8/mocks/MockLinkToken.sol";
import {VRFV2Wrapper} from "@chainlink/contracts/src/v0.8/VRFV2Wrapper.sol";

contract RockPaperScissorsTest is Test {
    RockPaperScissors public rockPaperScissors;
    VRFCoordinatorV2Mock public vrfCoordinator;
    MockLinkToken public linkToken;
    MockV3Aggregator public linkEthFeed;
    VRFV2Wrapper public vrfWrapper;

    LocalDeploymentScript public localDeploymentScript;

    uint256 public constant entryFees = 0.001 ether;

    function setUp() public {
        localDeploymentScript = new LocalDeploymentScript();
        localDeploymentScript.deployContracts();

        // Deploy Mock Contracts
        vrfCoordinator = localDeploymentScript.vrfCoordinator();
        linkToken = localDeploymentScript.linkToken();
        linkEthFeed = localDeploymentScript.linkEthFeed();
        vrfWrapper = localDeploymentScript.vrfWrapper();

        // Deploy RockPaperScissors contract
        rockPaperScissors = localDeploymentScript.rockPaperScissors();

        vm.deal(address(rockPaperScissors), 10 ether); // Allocating 10 ETH to the contract for gas and fees

        vm.deal(address(this), 10 ether); // Allocating 10 ETH to the testing account for gas and fees
    }
}
Here we are setting up the test environment we will need in order to thorougly test our smart contract. We reuse the LocalDeploymentScript we created earlier to help setup our tests and avoid repeating ourselves as the test setup is similar to the local deployment setup.
Let's write our first test which will test the playGame function. We will test that the player can enter a game by selecting a choice, send the required entry fee to the contract and get double the entry fees when they win. We will be mocking the random word returned by Chainlink with the fulfillRandomWordsWithOverride function in order to assure that the player wins the game.
    function testPlayGameAndWin() public {
        // Arrange
        uint256 requestId = rockPaperScissors.playGame{value: entryFees}(
            RockPaperScissors.Choice.ROCK
        );

        // Act
        uint256 mockRandomNumber = 2; // Should result in SCISSORS, player wins
        uint256[] memory randomWords = new uint256[](1);
        randomWords[0] = mockRandomNumber;

        vrfCoordinator.fulfillRandomWordsWithOverride(
            uint256(requestId),
            address(vrfWrapper),
            randomWords
        );

        // Assert
        (, , RockPaperScissors.Outcome outcome, ) = rockPaperScissors.statuses(
            requestId
        );

        assertEq(
            uint(outcome),
            uint(RockPaperScissors.Outcome.WIN),
            "Outcome should be WIN"
        );
        assertEq(
            rockPaperScissors.balances(address(this)),
            entryFees * 2,
            "Player should receive double the entry fee"
        );
    }
Now let's to the same thing but for draw and lose outcomes:
    function testPlayGameAndLose() public {
        // Arrange
        uint256 requestId = rockPaperScissors.playGame{value: entryFees}(
            RockPaperScissors.Choice.ROCK
        );

        // Act
        uint256 mockRandomNumber = 1; // Should result in PAPER, player loses
        uint256[] memory randomWords = new uint256[](1);
        randomWords[0] = mockRandomNumber;

        vrfCoordinator.fulfillRandomWordsWithOverride(
            uint256(requestId),
            address(vrfWrapper),
            randomWords
        );

        // Assert
        (, , RockPaperScissors.Outcome outcome, ) = rockPaperScissors.statuses(
            requestId
        );

        assertEq(
            uint(outcome),
            uint(RockPaperScissors.Outcome.LOSE),
            "Outcome should be LOSE"
        );
        assertEq(
            rockPaperScissors.balances(address(this)),
            0,
            "Player should not receive any ETH"
        );
    }

    function testPlayGameAndDraw() public {
        // Arrange
        uint256 requestId = rockPaperScissors.playGame{value: entryFees}(
            RockPaperScissors.Choice.ROCK
        );

        // Act
        uint256 mockRandomNumber = 0; // Should result in ROCK, player draws
        uint256[] memory randomWords = new uint256[](1);
        randomWords[0] = mockRandomNumber;

        vrfCoordinator.fulfillRandomWordsWithOverride(
            uint256(requestId),
            address(vrfWrapper),
            randomWords
        );

        // Assert
        (, , RockPaperScissors.Outcome outcome, ) = rockPaperScissors.statuses(
            requestId
        );

        assertEq(
            uint(outcome),
            uint(RockPaperScissors.Outcome.DRAW),
            "Outcome should be DRAW"
        );
        assertEq(
            rockPaperScissors.balances(address(this)),
            entryFees,
            "Player should get money back"
        );
    }
Now let's test the withdraw functions and make sure the player can withdraw their funds at any time. We will be using the vm.prank, deal and startHoax functions provided by forge so we can mock the address calling the functions. This is useful for testing the receive and fallback functions which are called when an address receives ETH.
    function testWithdrawNoBalance() public {
        vm.prank(address(1));
        vm.expectRevert("Insufficient balance");
        rockPaperScissors.withdraw();
    }

    function testWithdraw() public {
        // Arrange
        deal(address(rockPaperScissors), 10 ether);
        startHoax(address(1), 2 ether);
        // Play game and win
        uint256 requestId = rockPaperScissors.playGame{value: entryFees}(
            RockPaperScissors.Choice.ROCK
        );
        uint256 mockRandomNumber = 2; // Should result in SCISSORS, player wins
        uint256[] memory randomWords = new uint256[](1);
        randomWords[0] = mockRandomNumber;
        vrfCoordinator.fulfillRandomWordsWithOverride(
            uint256(requestId),
            address(vrfWrapper),
            randomWords
        );
        uint256 balanceBefore = address(1).balance;

        // Act
        rockPaperScissors.withdraw();

        // Assert
        assertEq(
            rockPaperScissors.balances(address(this)),
            0,
            "Player should have withdrawn all the ETH"
        );
        assertEq(address(1).balance, balanceBefore + entryFees * 2);
    }
With these tests written, we can now run the tests using the forge test command:
forge test
This should show that all the tests have passed and we can be confident that our smart contract is working as expected. We can now move on to deploying the smart contract to a test network.
Deploying the Smart Contract to Sepolia
Now we will be deploying to Sepolia which is a test network for the Ethereum blockchain. This will be simpler than deploying locally as we only need to fund and deploy the RockPaperScissors.sol contract since the Chainlink contracts are already deployed to the Sepolia network by Chainlink. Create a new file called RockPaperScissors.s.sol in the scripts directory and add the following code:
// SPDX-License-Identifier: UNLICENSED
pragma solidity ^0.8.13;

import {RockPaperScissors} from "../src/RockPaperScissors.sol";
import {Script, console} from "forge-std/Script.sol";

contract RockPaperScissorsScript is Script {
    function setUp() public {}

    function run() public {
        // Get needed environment variables
        uint privateKey = vm.envUint("DEV_PRIVATE_KEY");
        address linkTokenAddress = vm.envAddress("LINK_TOKEN_ADDRESS");
        address vrfWrapperAddress = vm.envAddress("VRF_WRAPPER_ADDRESS");
        // Get account address
        address account = vm.addr(privateKey);
        console.log("Account: ", account);

        vm.startBroadcast(privateKey);
        console.log("Deploying RockPaperScissors...");
        RockPaperScissors rockPaperScissors = new RockPaperScissors{
            value: 1 ether
        }(linkTokenAddress, vrfWrapperAddress);

        console.log("RockPaperScissors address: ", address(rockPaperScissors));
        vm.stopBroadcast();
    }
}
Before running this, we need to make sure we have the needed environment variables set in our .env file. You can find the respective addresses for the LINK_TOKEN_ADDRESS and VRF_WRAPPER_ADDRESS provided by Chainlink here. As for the DEV_PRIVATE_KEY, this will be the private key of the account we will use to deploy the contract. We also need to set the SEPOLIA_RPC_URL which can be found in ChainList.
Also, make sure there is enough ether in the deployment account to fund the contract. In this case, it is 1 ether. This is needed in order to be able to payout players with the withdraw function. Feel free to change this value in the script. If more testnet tokens are needed, you can get some from these faucets for Sepolia.
Once this is set, we can simulate the deployment script using the forge script command:
forge script script/RockPaperScissors.s.sol:RockPaperScissorsScript --rpc-url $SEPOLIA_RPC_URL
This will merely simulate the deployment to the network and make sure everything works as intended but not broadcast the changes. In order to broadcast and fully deploy the smart contract, we need to add the --broadcast flag. Optionally, we can set the ETHERSCAN_API_KEY in our .env file and add the --verify flag so we can verify the contract on Etherscan. This can be obtained by creating an etherscan account and generating an API key. Also optional is adding the -vvvv flag in order for the terminal to output more verbosely. Once this is set, we can run the following command to deploy the smart contract to the Sepolia network:
forge script script/RockPaperScissors.s.sol:RockPaperScissorsScript --rpc-url $SEPOLIA_RPC_URL --broadcast --verify -vvvv
This will output the address of the deployed smart contract and its respective etherscan link.
Next, we need to fund our contract with LINK so it can request randomness from Chainlink. To do this we can get Sepolia testnet LINK from this faucet. Then send about 5 LINK to our contract address using Metamask.
Once that's done let's test out the smart contract deployed to Sepolia by calling the respective functions in etherscan. To do this, we connect our wallet to etherscan and call the playGame function with 0.001 for the payable fees and an integer between 0-2 for our choice:
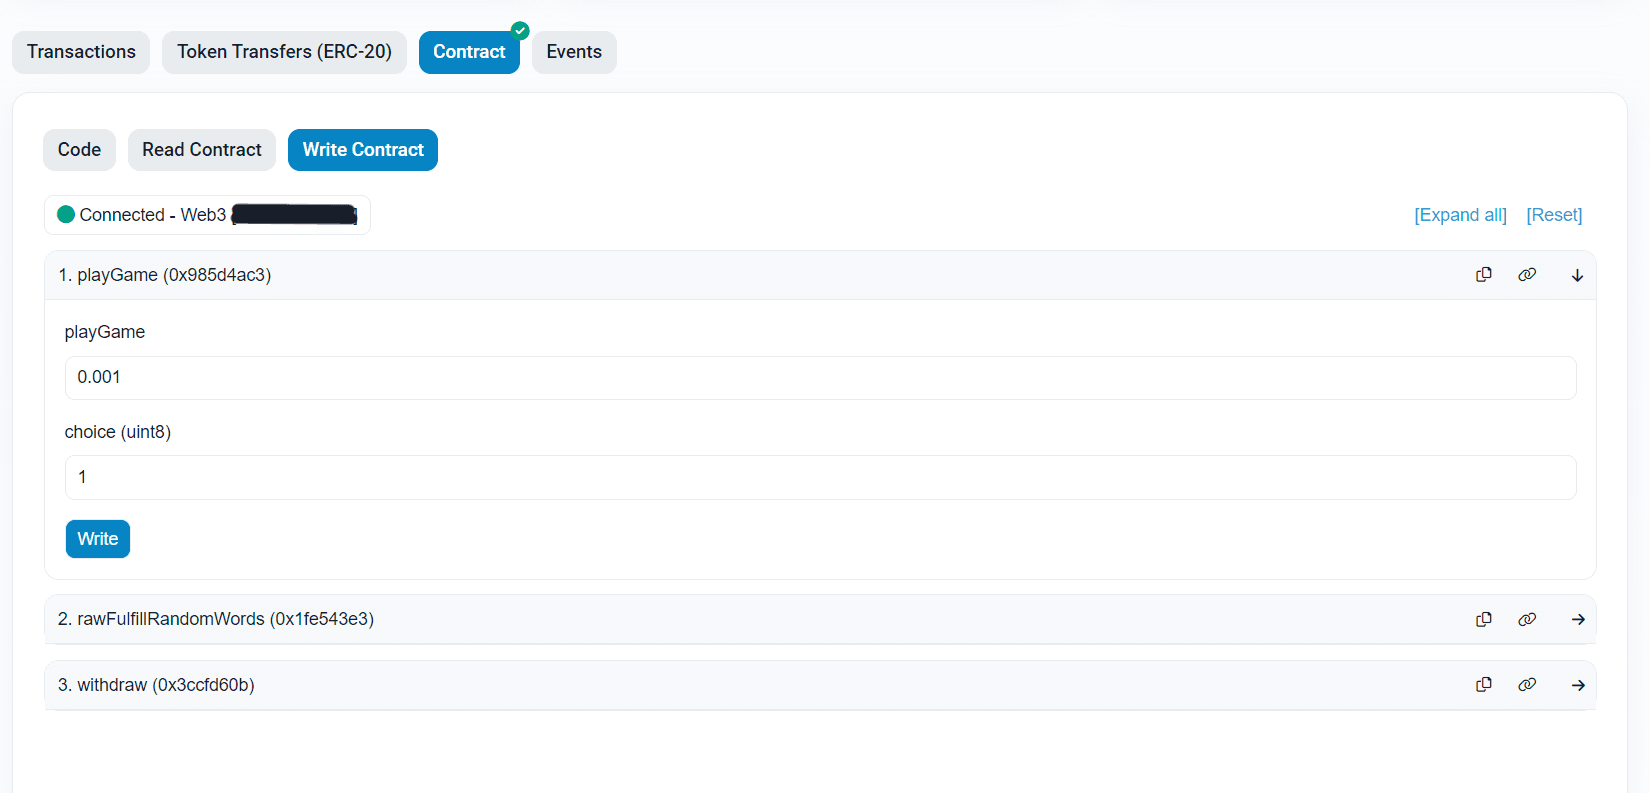
Go through the prompt and confirm. This will initiate a transaction on Sepolia which could take a few minutes to finish. Once the transaction has completed, we can check the status of the game.
In order to check the status we need to get the requestId returned by the playGame function. This can be found in the transaction logs on etherscan and should look something like this.
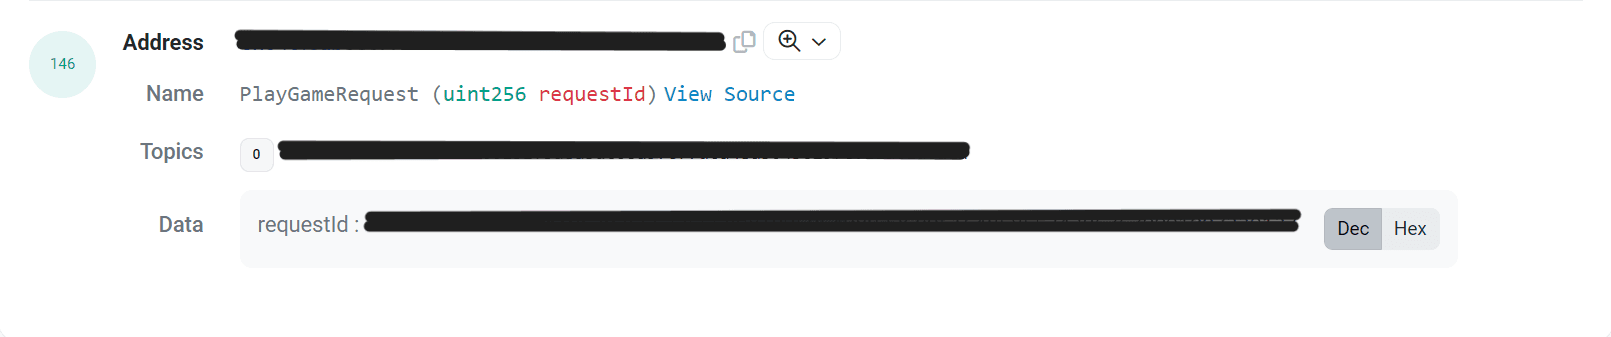
Copy the requestId value and input it into the getStatus function in etherscan under the read contract tab to query the game status. Continue querying until you get a fulfilled status of true. This means the randomness request has been fulfilled and the game has been completed. The status will also show the outcome of the match, so be sure to check it out!
In case of a win or a draw, the balance should update accordingly which you can check with the getBalance function. This would also be a good time to test out the withdraw function! I'll let you handle it as calling the function is a very similar process to the previous functions.
And with that, the contract is now deployed to Sepolia and working as expected!
Integrating the Smart Contract with Next.js
Now, let's move over to the frontend directory. Since this tutorial focuses on the Web3 aspect of the Dapp, this part will only cover the integration of the smart contracts and wallets. You can find the full frontend code in the GitHub repository for your reference.
Let's install the dependencies we would need for the frontend. We'll be using RainbowKit to easily integrate wallet connection to our app:
pnpm add @rainbow-me/rainbowkit wagmi viem@2.x @tanstack/react-query
With that, let's setup RainbowKit, Wagmi and React Query so our app can connect to the Ethereum blockchain and interact with our smart contract and user wallets. We can start by creating a new file called providers.tsx in the app directory and add the following code:
"use client";

import {
  RainbowKitProvider,
  getDefaultWallets,
  getDefaultConfig,
  darkTheme,
} from "@rainbow-me/rainbowkit";
import {
  argentWallet,
  trustWallet,
  ledgerWallet,
} from "@rainbow-me/rainbowkit/wallets";
import { sepolia, hardhat } from "wagmi/chains";
import { QueryClient, QueryClientProvider } from "@tanstack/react-query";
import { WagmiProvider } from "wagmi";
import { env } from "~/env";

const { wallets } = getDefaultWallets();

export const config = getDefaultConfig({
  appName: "RPS3",
  projectId: env.NEXT_PUBLIC_WALLET_CONNECT_PROJECT_ID,
  wallets: [
    ...wallets,
    {
      groupName: "Other",
      wallets: [argentWallet, trustWallet, ledgerWallet],
    },
  ],
  chains: [sepolia, hardhat],
  ssr: true,
});

const queryClient = new QueryClient({});

export function Providers({ children }: { children: React.ReactNode }) {
  return (
    <WagmiProvider config={config}>
      <QueryClientProvider client={queryClient}>
        <RainbowKitProvider theme={darkTheme({ accentColor: "#244a9e" })}>
          {children}
        </RainbowKitProvider>
      </QueryClientProvider>
    </WagmiProvider>
  );
}
Let's use this provider in our layout.tsx file:
import "~/styles/globals.css";

import { Inter } from "next/font/google";
import { Providers } from "./providers";

const inter = Inter({
  subsets: ["latin"],
  variable: "--font-sans",
});

export const metadata = {
  title: "RPS3 - Rock Paper Scissors",
  description: "Web3 Rock Paper Scissors",
  icons: [{ rel: "icon", url: "/favicon.ico" }],
};

export default function RootLayout({
  children,
}: {
  children: React.ReactNode;
}) {
  return (
    <html lang="en">
      <body className={`font-sans ${inter.variable}`}>
        <Providers>{children}</Providers>
      </body>
    </html>
  );
}
With that, our app now has access to the wagmi hooks and the RainbowKit wallet connection. Let's create a new directory called contracts under the src directory which will store our RockPaperScissors.ts file which will contain the contract ABI and address. In order to generate the ABI we can go into our foundry directory and run the following commmand which will output the ABI in JSON format:
forge build --silent && jq '.abi' ./out/RockPaperScissors.sol/RockPaperScissors.json
We can then add the generated ABI to the RockPaperScissors.ts file. Be sure to add in the necessary env variables in .env and .env.js for our contract address.
import { env } from "~/env";

export const rockPaperScissorsAbi = [
    // ... GENERATED ABI
] as const;

export const rockPaperScissorsContract = {
  address:
    env.NEXT_PUBLIC_NETWORK === "sepolia"
      ? (env.NEXT_PUBLIC_ROCK_PAPER_SCISSORS_ADDRESS as `0x${string}`)
      : (env.NEXT_PUBLIC_LOCAL_ROCK_PAPER_SCISSORS_ADDRESS as `0x${string}`),
  abi: rockPaperScissorsAbi,
};
Notice the as const at the end of the rockPaperScissorsAbi array. This is a TypeScript feature that tells the compiler to infer the array which will give us better type completion when using the wagmi hooks.
Allowing a user to connect their wallet is pretty straightforward with RainbowKit as they provide a ConnectButton component that we can use. It's as simple as adding the following code to our index.tsx file:
  import { ConnectButton } from "@rainbow-me/rainbowkit";
  <ConnectButton />
Now, for the fun part. Let's integrate the wagmi hooks and let our frontend interact with the smart contract.
Let's first read data from the contract so we can display it for the user. Read functions are functions that don't change the state of the contract and are free to call. In this case, our smart contract exposes getGameHistory, balances and lastRequestId as read functions that we can use for out frontend. We will be using the useReadContract hook from wagmi to call these read functions.
We will also be utilizing the useAccount hook throughout the frontend which will provide us with the details of the connected wallet.
  const account = useAccount();

  const { data: gameHistoryData, refetch: refetchGameHistory } =
    useReadContract({
      ...rockPaperScissorsContract,
      functionName: "getGameHistory",
      account: account.address,
      query: {
        enabled: account.isConnected,
      },
    });

  const { data: balanceResult, refetch: refetchBalance } = useReadContract({
    ...rockPaperScissorsContract,
    functionName: "balances",
    account: account.address,
    args: [account.address!],
    query: {
      enabled: account.isConnected,
    },
  });

  const { data: lastRequestIdResult, refetch: refetchLastRequestId } =
    useReadContract({
      ...rockPaperScissorsContract,
      functionName: "lastRequestId",
      account: account.address,
      args: [account.address!],
      query: {
        enabled: account.isConnected,
      },
    });
Notice that we used the rockPaperScissorsContract we created earlier that contains the ABI and address of the smart contract. Most of wagmi's hooks that communicates with a smart contract takes in these details, so it can fetch the data from the smart contract and infer the types of the returned values.
Here are the important bits of using the read contract hook:
- The
functionNameand theaccountaddress as arguments to properly fetch the desired data from the smart contract. - The
queryobject (exposed by react query) is used to enable the hook only when the account is connected. This is useful as we don't want to fetch data from the smart contract when the user is not connected to a wallet. - The
refetchfunction is used to manually refetch the data from the smart contract. This is useful when we want to update the data after a transaction has been made. This is usually used when we need to update the data after an event or after a user transaction.
Now let's utilize the useWriteContract and useWaitForTransactionReceipt hooks to allow the user to play the game by interacting with the smart contract. Write functions are functions that change the state of the contract, require a transaction to be made and costs gas to execute.
  const {
    data: hash,
    isPending,
    writeContract,
    reset,
  } = useWriteContract({
    mutation: {
      onSuccess: () => {
        void refetchLastRequestId();
      },
    },
  });

    const {
    isLoading: isConfirming,
    isSuccess: isConfirmed,
    error,
  } = useWaitForTransactionReceipt({
    hash,
  });

    const onClickPlay = () => {
    if (!userChoice) {
      return;
    }

    writeContract({
      ...rockPaperScissorsContract,
      functionName: "playGame",
      args: [choiceToNumber(userChoice)],
      value: parseEther("0.001"),
    });
  };

  const onReset = () => {
    setOpponentChoice(null);
    setUserChoice(null);
    reset();
  };
The useWriteContract hook returns a writeContract function which we use to call the playGame function in the smart contract. We pass in the value of 0.001 ether which is the entry fees for the game and the user's choice as an argument.
Notice that we refetch the last request ID after the transaction is successful. This is because the playGame function returns a request ID which we need when we are developing locally and need to manually fulfill the randomness request. On the mainnet and testnets, this is not necessary as the randomness request is automatically fulfilled by Chainlink.
The useWaitForTransactionReceipt hook is then used to check the status of the transaction that the writeContract initiates. We use the isPending, isConfirming and isSuccess booleans to display the status of the transaction to the user. The error object is used to display any errors that may occur during the transaction.
Now, since the playGame function merely creates a request to Chainlink VRF, we need to wait for their response by watching the PlayGameResult event that will be emitted when our smart contract's fulfillRandomWords is called by Chainlink. We can use the useWatchContractEvent wagmi hook for this:
  useWatchContractEvent({
    ...rockPaperScissorsContract,
    eventName: "PlayGameResult",
    args: {
      player: account.address,
      requestId: lastRequestIdResult,
    },
    onLogs(logs) {
      if (!userChoice) return;

      const outcome = logs[0]?.args.outcome;

      if (!outcome) return;

      const computerChoice = outcomeToComputerChoice(
        outcome as 0 | 1 | 2 | 3,
        userChoice,
      );

      setOpponentChoice(computerChoice);
      void refetchGameHistory();
      void refetchBalance();
    },
    onError(error) {
      console.error(error.message);
    },
    enabled: account.isConnected && !!account.address && !!lastRequestIdResult,
  });
This hook allows us to watch for the PlayGameResult event and filter it by the player and requestId via the args object. When the event is emitted, we can then set the opponent choice, update the game history and update the balance of the user by refetching the data from the smart contract.
We can apply these hooks and logic for the user balance and withdraw functions as well:
  const {
    data: hashWithdraw,
    isPending: withdrawPending,
    writeContract,
  } = useWriteContract({
    mutation: {
      onSuccess: () => {
        refetchBalance();
      },
    },
  });

  const {
    isLoading: isWithdrawing,
    isSuccess: isSuccessWithdraw,
    error: errorWithdraw,
  } = useWaitForTransactionReceipt({
    hash: hashWithdraw,
  });

  const onClickWithdraw = () => {
    writeContract(
      {
        ...rockPaperScissorsContract,
        functionName: "withdraw",
      },
      {
        onError: (error) => {
          console.error(error.message);
        },
      },
    );
  };
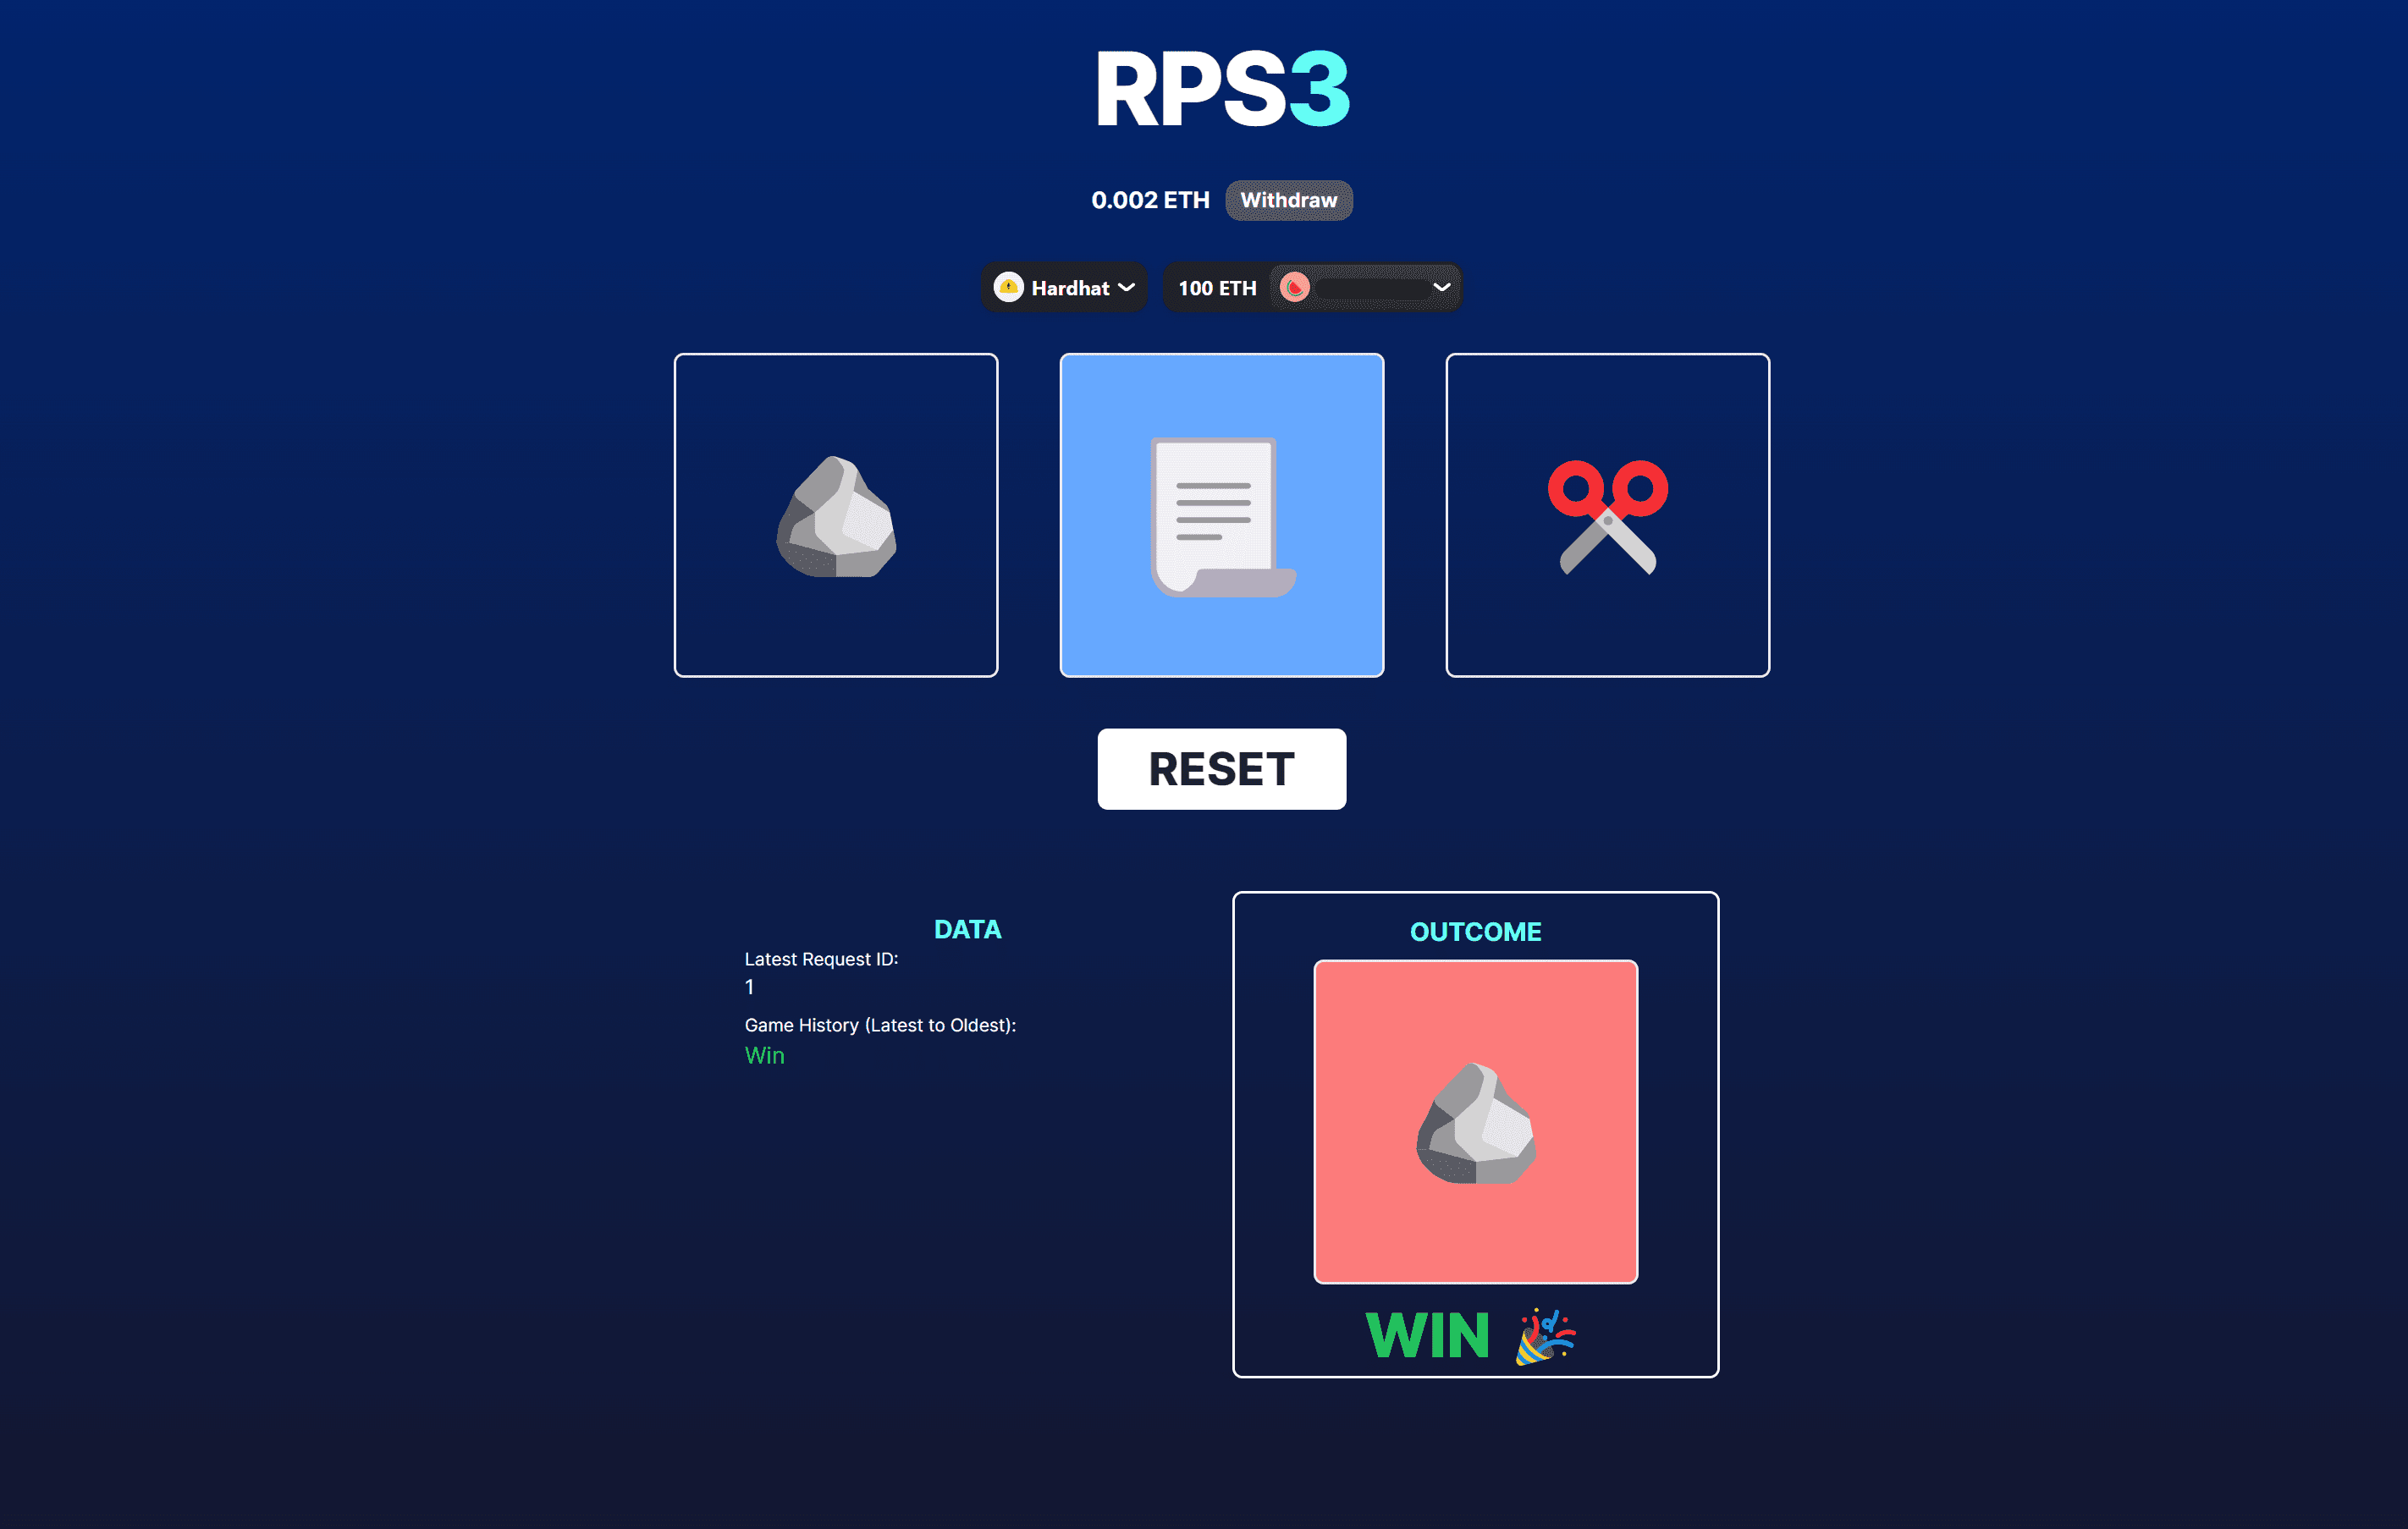
Now with that, our frontend is now fully integrated with our smart contract and users can play the game and see their results in real time!
Running the Dapp Locally
If you want to run this entire app end to end, you can find step by step instructions in the GitHub repository's README.